How To Tie The Rapala Knot
The Best Fishing Knot For Crankbaits
The Rapala Knot is a non slip knot containing a loop which allows fishing lures to move more freely.
The rapala fishing knot is perfect to tie directly to your favorite rapala crankbaits, like the deep diving crankbaits, lipless crankbaits, shallow divers, and jerkbaits. Feel free to tie on a swimbait too. It doesn't necessarily have to be a Rapala fishing lure, but...
This fishing knot has been recommended by the Rapala brothers too. The rapala minnow crankbait plug was designed to imitate an injured minnow. To fully maximize that shimmy shake wobble when fishing those lures as they were designed to do, the rapala loop knot is the best knot to use.
Knots that snug tight to the split ring or eyelit actually restrict the lure from naturally moving to it's fullest potential. Other things that can disturb the lures' natural mobility could be additional attachments such as snaps, clasps and swivels.
If you plan to use weight to get the lure down deeper in the water, be sure to keep it away from the lure. If using a small weight like a small split shot sinker, place it about 6 inches or so from the lure. Bigger weights should be placed further away on the line, like from 10 to 18 inches.
The rapala loop knot is basically tying an overhand knot and a fisherman's improved clinch knot. Check it out...
Rapala Knot Tying Instructions
Steps On How To Tie The Rapala Fishing Knot:
1. Tie an overhand knot then pass the tag end through the eye or the split ring of the fishing lure.

2. Pass the tag end through the overhand knot.

3. Make about 3 wraps around the standing main line, going away from the lure and overhand knot. You're actually just starting with tying an improved clinch knot here, but without as many wraps unless you want as many.

4. Pass the tag end back through the overhand knot.

5. Bring the tag end back up through the loop which was just formed resulting from the previous step.

6. Moisten and pull the lines to cinch the knot nice and snug. Then trim the tag end.
You can form the loop knot as close to the lure as you would like, but the purpose is to allow it to move freely, and not to have a knot snugged tight onto the lure to restrict it's natural motion.

That's it. The Rapala Knot is all tied up. The only thing left is to toss it out and and crank those fish in. Shake, rattle and roll in your favorite saltwater or freshwater fishing hot spots. It's a "wrap"!
Fishing Knot Guide Books, Instruction Videos, Kindle
Editions and Waterproof Knot Cards
If you're serious about fishing, it's a good idea to learn
about which knots are best to use and for what.
Books and videos are perfect just for that. It can also be just as
helpful to carry a set of waterproof knot tying instructions with yourself
out on the water.
NEW Merch Available Now!

Recent Articles
-
8 Must Have Bass Fishing Books - Top Picks And Best Sellers
Apr 16, 26 08:18 PM
Must have favorite bass fishing books highly recommended to read. 8 of the top selling books about bass fishing written by experienced professional bass anglers. -
7.2 lb Football Fatty - Alabama Lagemouth Bass
Nov 21, 24 12:50 PM
 Got this 7.2 lb, 18 inch big girl from a corporate business pond. She was hanging out in a shallow pool underneath a small waterfall.
 -
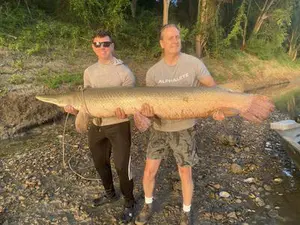
Monster Trinity River Alligator Gar
Sep 21, 23 11:30 AM
 Great Father and son day on the Trinity River in Palestine, Texas July 16, 2023. My son, Air Force Lieutenant Andrew Jordan Grove landed this 218lb, 7